• Home
  • About
  • YouTube
  • Esty Shop
  • That’s Sew Cool!
    • Facebook
    • Instagram
    • Pinterest
    • YouTube

Paige Handmade

You are here: Home / Sewing Machine Basics / How to Thread a Sewing Machine

How to Thread a Sewing Machine

in Sewing Machine Basics on 02/03/20

“You crawl before you walk, you walk before you run.”

You thread before you sew.

I tell people that sewing is just a collection of techniques strung together and the more techniques you collect the better you get. The first technique to add to your tool belt is setting up your machine to sew. First you wind your bobbin then you thread your machine.

The threads simply need to go through a series of checkpoints. Take the time to look at your user manual for the specific details for your sewing machine. In both the written and video instructions, I am using a Brother sewing machine as an example. There will be little variations between brands and models of sewing machine.

Lower Threading (from the bobbin):

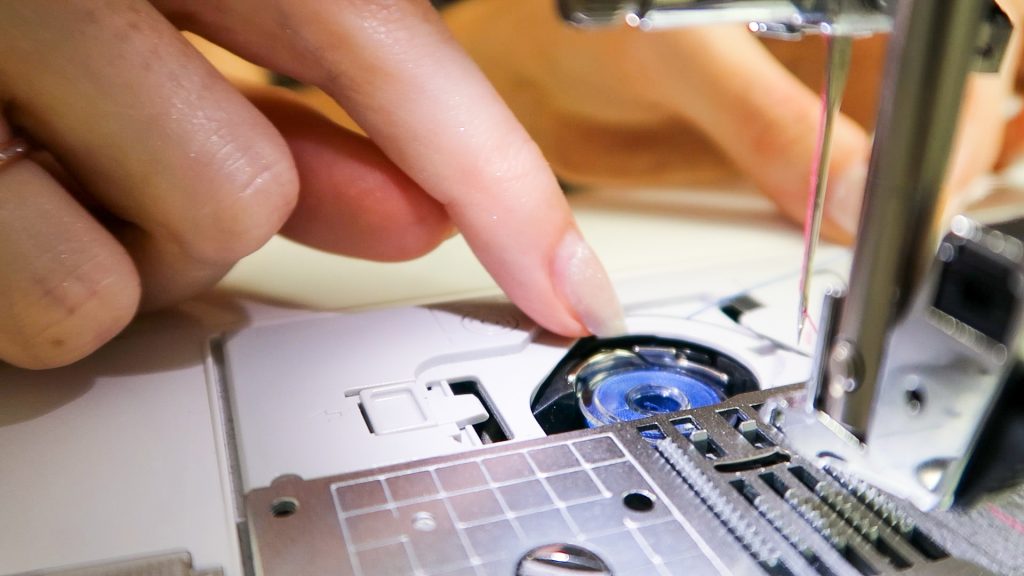
  1. Turn off your machine. Raise needle and foot. Remove the drop-in bobbin cover.
  2. Place the bobbin into place with the thread turning the correct direction. *Counter clockwise for my Brother sewing machine.
  3. Hold the bobbin in place with one finger and with the other hand hold the thread tail. Pull the thread through the guide, making sure it goes under the tension- adjusting spring. *detail shot in video
  4. Pull it through the rest of the guide and to the thread cutter.
  5. Put the cover back into position.

Upper (from the spool of thread):

  1. Place the spool of thread onto the spool pin. Cap the spool pin with a cap that is bigger than the spool.
  2. Pull the thread under the thread guide and thread guide cover.
  3. Pull thread toward you and down through the upper tension disks.
  4. Loop under and back up to the thread take-up lever. Guide it through the thread take-up lever.
  5. The pull down to the needle bar thread guide. Hook it behind the guide.
  6. Thread the needle either by eye or using the needle threader.

Draw up the lower thread. To do this hold the tail of the upper thread. Turn the hand wheel, the upper thread will go down and around the bobbin, and as the needle comes up the upper thread will pull the bobbin thread up. Pull threads to where the tails are even in length, about 3 inches long. Place them behind the presser foot.

BONUS in the video… How to thread a twin/double needle!

Remember, learning is a process. The more you practice, the faster you will get. Threading your sewing machine will become built into your muscle memory and you won’t even have to think about it. One more tool in your tool belt!

Related

Add a Comment

My Sewing Recommendations: Paige Handmade Amazon Storefront*

*The products linked are all products I personally have used, enjoy, or are on my wishlist! Some links may be affiliate links. The affiliate links do not affect the price you pay, but they do provide a small compensation to me. I am a participant in the Amazon Associates Program.

« How to Wind a Bobbin
Thread Tension & Troubleshooting »

Leave a Reply Cancel reply

Your email address will not be published. Required fields are marked *

Hi! I'm Paige... Paige

...an elf who has achieved Master Tinker status. Give me a tool and I’ll make something! I am married to the coolest nerd and Mama to two girly girls.

My mission is to take the overwhelm out of projects, so you can go get creative and make something you love! a little more backstory…

Getting Started Sewing

How to Thread a Sewing Machine

"You crawl before you walk, you walk before you run." You thread before you sew. I tell people that sewing is just a collection of techniques strung ... View Post

Thread Tension & Troubleshooting

One of the most frustrating problems you may run into when learning how to sew is thread tension issues. The thread can be too tight and bunch up the seam or, ... View Post

Selecting Stitches on a Sewing Machine

Selecting a Stitch Sewing machines can come with a large assortment of stitch options. You'll see some with *50 stitches, *110 stitches, *240 stitches, and ... View Post

paigehandmade

A little fun bias binding on the vent of this skir A little fun bias binding on the vent of this skirt. ✨
Another pair of socks that deserve a solemate phot Another pair of socks that deserve a solemate photo. They are quirky and cozy. 🧦 

As always, the #imsobasicsocks is the foundation pattern.

#sockknitting #knitsocks #boxofsocks2023
Today I did my own plumbing work for our shower re Today I did my own plumbing work for our shower remodel. I was afraid to do it, but I spent a lot of time learning and preparing. The more information I learned the more I felt capable. The soldering made me nervous and my hands felt a little shaky, but I committed no matter the outcome. I followed all the steps (even if they aren't shown in this tiny video). John encouraged me and showed me how to turn our water supply off for the first time. This was a good exercise in being willing to try something new. I'm really proud! We turned the water on and it's holding tight! On to the next task. 🚿

#bathroomremodel #homerenovation #plumbing
Watermelon socks for my birthday. They have long b Watermelon socks for my birthday. They have long been knit and blocked but I've only just got around to taking a proper photo. They are too cute to neglect. 

Yarn: @labienaimee "Pinku Graffiti" & "Malachite"
Pattern: a spin on @summer.lee.knits #imsobasicsocks
Load More... Follow on Instagram

paigehandmade

A little fun bias binding on the vent of this skir A little fun bias binding on the vent of this skirt. ✨
Another pair of socks that deserve a solemate phot Another pair of socks that deserve a solemate photo. They are quirky and cozy. 🧦 

As always, the #imsobasicsocks is the foundation pattern.

#sockknitting #knitsocks #boxofsocks2023
Today I did my own plumbing work for our shower re Today I did my own plumbing work for our shower remodel. I was afraid to do it, but I spent a lot of time learning and preparing. The more information I learned the more I felt capable. The soldering made me nervous and my hands felt a little shaky, but I committed no matter the outcome. I followed all the steps (even if they aren't shown in this tiny video). John encouraged me and showed me how to turn our water supply off for the first time. This was a good exercise in being willing to try something new. I'm really proud! We turned the water on and it's holding tight! On to the next task. 🚿

#bathroomremodel #homerenovation #plumbing
Watermelon socks for my birthday. They have long b Watermelon socks for my birthday. They have long been knit and blocked but I've only just got around to taking a proper photo. They are too cute to neglect. 

Yarn: @labienaimee "Pinku Graffiti" & "Malachite"
Pattern: a spin on @summer.lee.knits #imsobasicsocks
Guess who's back!? My studio tour just went live o Guess who's back!? My studio tour just went live on @youtube. I hope you like getting a peak into how I organize this space. All sources are linked on my blog. Link in profile. 💕

#roomreveal #sewingroom #sewingstudio #homeschoolroom #arossweater
Condensing one month into 40 seconds. ⏳ #roomm Condensing one month into 40 seconds. ⏳ 

#roommakeover #renovation #beforeandafter #wallpaper #paint
Load More... Follow on Instagram

Copyright © 2023 · Paige Handmade